Introduction
During a penetration test there are several options for access or lateral movement once passwords or hashes are discovered. Two of those options are Impacket’s PsExec and SMBExec, both of which I’ve used with varying levels of success. In experimenting with both of them, I’ve found that PsExec gets caught and quarantined nearly 100% of the time during a penetration test, including by Windows Defender on my own test machines, while I’ve been able to use SMBExec without issue while only resulting in relatively low-level alerts being issued occasionally, depending on the EDR suite in use. I wanted to take a closer look at both of these programs to better understand why one is so easy to detect and the other is not, and to better understand the artifacts they each leave behind on the victim systems.
PsExec
Let’s start with impacket-psexec — based off of the Microsoft PsExec program from SysInternals, impacket-psexec is a Python implementation that offers PsExec-like functionality. After spinning up a Kali and Windows 10 VM, I quickly launched impacket-psexec against the administrator account on the Windows VM and ran into the first hurdle: Windows Defender promptly caught and quarantined it, as expected.

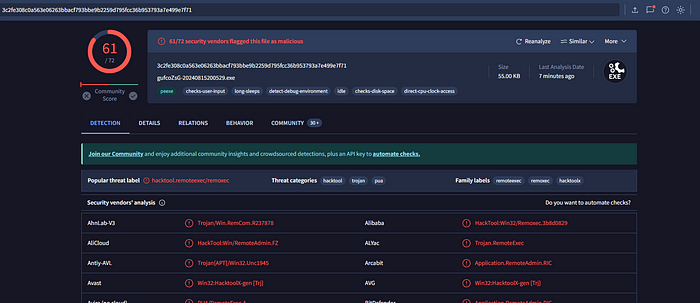
In the screenshot above you can see Defender caught the affected item, PAnFXjDZ.exe in the C:\Windows directory. This is the first clue as to why PsExec is so easily caught — dropping a file to disk is much easier for antivirus to detect. During a short rabbit hole, I computed the hash of the file and ran it through VirusTotal and found that it was easily identified as malicious by 61 out of 72 major antivirus providers.

With its default settings, psexec can’t help but get caught. However, to continue analyzing the tool and the artifacts it leaves on the victim, I had to temporarily disable Windows Defender on the VM. Now, I was able to successfully execute the tool and gain remote command access and begin looking at the processes created and the artifacts left on the system.
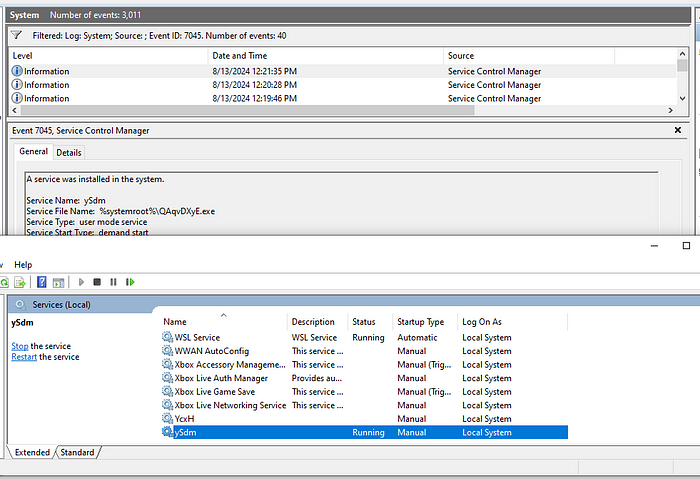
As we saw above, impacket-psexec transfers an executable to the C:\Windows directory of the target as a randomly named file, but in addition to that it installs a randomly named service with the binary as its service file (impacket-psexec does include command line options to specify the names of the file and the service that is created, which can be useful to identify your actions to the blue team after concluding the test or to mimic a specific threat actor, though I do not do that here). This process can be seen by opening up the event viewer and filtering for event ID 7045.

You can also view the created service in the Services application.

Already we’re seeing a lot of traceable activity to the program — a binary transferred to disk, a service created and started, and an event ID viewable in Windows Event Viewer.
Now in order to take a deeper look at what goes on under the hood, I downloaded a copy of the SysInternals Suite to the Windows VM and started up Process Monitor (ProcMon). After exiting and creating a new session with impacket-psxec, I applied the appropriate filters to ProcMon and took a look at the processes created.

The image above shows just a small sample, but as you can see there are a number of actions taken as a part of running PsExec — Thread Creates and Exits, Create File and Close File, Registry Queries, Load Images, etc. All of it adds up to a rather noisy process of gaining access and executing commands. And those are just the ones I was able to find that are executed directly by the binary. I’m sure there are other process that are started by the binary and executed by cmd or other processes that I didn’t capture during this analysis.
The Rabbit Hole
Now here is where I got a little bit side tracked and fell into a rabbit hole. I wanted to see if I could modify impacket-psexec to run on a victim machine without getting caught and quarantined by Windows Defender. To start, I took a closer look at the source code behind impacket-psexec and found that in order to obtain the PsExec-like functionality it utilized an open-source program called RemCom, available on Github. In looking closer at impacket-psexec, I also noticed that it included a command line flag to specify your own executable in place of the version of RemCom prepackaged by Impacket. What followed was a bit of an adventure as I downloaded the RemCom source code and attempted to build the executable using Visual Studio 2022, which apparently does not contain the Windows 7.1 SDK with which the original project was built. Instead, I had to retarget the solution to use the packages compatible with VS 2022, which was a challenge in itself as sometimes the “Retarget Solution” option would be available and other times it was not, and attempting to do it manually would sometimes work for one part of the project and not another, resulting in a failed build. Long story short, I eventually figured out how to compile the project in VS 2022 and build the executable, though it took significantly longer than I expected.
With the newly compiled binary in hand, I ran the hash of the file through VirusTotal and to my surprise it registered as clean. Now, all this meant was that the hash of the file wasn’t yet registered with the antivirus solutions used by VirusTotal and not that the executable would go undetected once transferred, but it at least was a promising sign. Double checking that Defender was disabled on my victim machine, I ran impacket-psexec and passed it the newly compiled binary using the “-f” flag and waited…. and waited… and waited… until finally admitting to myself that the process appeared to be hanging. Killing the process I jumped over to my Windows VM to see what was going on. Defender was disabled and I could see the binary had been successfully transferred and given it’s usual random name, and the service for it had been created. I started monitoring with ProcMon and connected with it again, but I wasn’t yet familiar enough with the processes created and necessary to know what was missing or going wrong.
Jumping back to my Kali VM, I took another look at the impacket-psexec script and noticed that it made use of another impacket script, remcomsvc.py. Taking a look at this file, I found that it appeared to contain the hex dump for the RemCom binary prepackaged with impacket, and comments that stated if you wanted to use your own application, to dump the executable with a tool such as hexlify and replace the existing hex with it. With the help of a little bit of Python, I dumped the hex from my built version of RemCom, replaced the existing code with it in the file, and tried again. Unfortunately, execution still hung after transferring the file and creating the service.
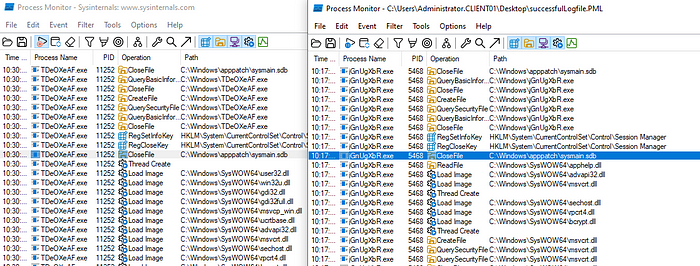
At this point, it occurred to me that I hadn’t even verified that my built version of RemCom even worked (talk about an oversight). Spinning up another Windows VM that I luckily already had on my system, I transferred and whitelisted my RemCom binary, opened up a command prompt, and ran “RemCom.exe -h” fully expecting it to crash or hang. Instead, I got the help menu, the first indication that it was working, and a couple of minutes later I had successfully obtained a remote session with it between my two Windows VMs. Now I knew that the binary had built correctly and could be used to obtain a remote session, making me believe there was some incompatibility specifically with the one I built and impacket-psexec. As one last effort, I decided to save and compare ProcMon captures of a successful authentication with the default psexec and an unsuccessful authentication using my built binary.

The processes executed identically until the point shown in the side by side views above. The successful execution on the right shows the service closes the file “C:\Windows\apppatch\sysmain.sdb” then conducts a ReadFile of “C:\Windows\SysWOW64\apphelp.dll”. The unsuccessful execution with my built binary on the left shows that after the CloseFile for sysmain.sdb it creates a thread and loads a series of images instead of reading apphelp.dll. This difference in process execution could be attributed to my binary being retargeted to compile with Visual Studio 2022 and breaking something, or something else entirely that I don’t understand yet. Either way, I’d spent enough time for now on my rabbit hole and decided I’d give this a break and return to the original mission of this post.
(During my rabbit hole I came across another psexec alternative — pypsexec. After my Impacket analysis I ended up taking a look at this program, details of which you can read in this post.)
SMBExec
Impacket-smbexec takes a different approach to interacting with the victim system than psexec. Let’s re-enable Windows Defender, connect with SMBExec, and take a look at what we find:

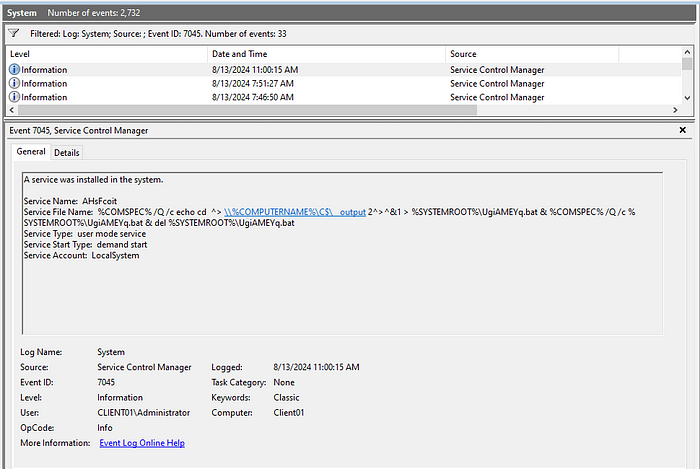
Once again filtering for event IDs 7045, we see that SMBExec creates a randomly named service on the system and executes a somewhat complicated looking one-liner (without tripping Defender). Breaking out the command into its individual components we learn that it’s doing the following:
- Calls cmd.exe to echo the command submitted by the attacker (“cd” in this case) to a bat file (%COMSPEC% is the environment variable pointing to cmd.exe) while redirecting stdout and stderr to a temporary file
- Executes the bat file
- Deletes the bat file
The script back on the attacker side then grabs the output file through SMB and displays the output in our terminal. Through this method no executable is dropped on the victim system, thus reducing our risk of detection, but at the same time it does not actually provide an interactive shell because the output of the commands are being stored in a file and then the contents of that file are then being displayed in our terminal. So you have to be careful not to run any commands that require user input as the process will then just hang.
Taking a look with ProcMon we see the following:


We can see the CMD process running the one-liner to go through the process we just described above. We can then take a look at the bat file created:

Taking a look at the options in the pop-up information box, we see that the created bat file is set to delete on close. As soon as the process has created and run the bat file, it closes and immediately gets deleted, removing one of the traces that this system was compromised.
Viewing this process in action, we see why impacket-psexec is stealthier than impacket-psexec — no binaries get dropped to disk, the bat file and output file are immediately deleted, and the service itself is deleted after command execution as well. However, because this process is repeated and a new service created for each individual command, the 7045 Event IDs can quickly pile up.

If the defenders are actively monitoring for 7045 events, remote command execution with impacket-smbexec can be detected.
Summary
Impacket-psexec and impacket-smbexec are just two options available from Impacket, not to mention all of the other options available from other resources. While both options can be utilized to accomplish largely the same goal, their method of execution and the artifacts they leave behind must be evaluated and determined if they assist in accomplishing the goal of the penetration test/red team engagement. If you use either of these tools for RCE or defend against these tools, I’d highly recommend setting up a lab environment and analyzing the artifacts and indicators of compromise left by these tools so you can better determine if it’s the right tool for the job or what you can do to detect and protect against these tools. And of course, don’t use these tools against systems you do not own or have explicit permission to test against.
